Acura TSX 2009-2014: Transmission Diagnostic Guide
Transmission problems are often the most intimidating in the Acura TSX. Read on to learn how to diagnose it.
This article applies to the Acura TSX (2009-2014).
The transmission is considered one of the most expensive parts of your Acura TSX. Transmission shops know the complexity of the transmission system and, as a result, they charge a lot of money for inspection and repairs. Although it may be wise to visit a transmission shop, it's even wiser to diagnose it yourself first. Some transmission issues are much simpler than you may think, and discovering them yourself can end up saving you a lot of money. This guide will show you how to diagnose the common transmission issues in your Acura TSX.

Materials Needed
- Flashlight
- Allen head
- Socket
Step 1 – Check the transmission fluid
It could be old or low.
Fortunately, the Acura TSX comes with a transmission dipstick, so you don't have to locate the filler hole and check from underneath the vehicle. Check the transmission dipstick to inspect the transmission's fluid level and color. Good transmission fluid should have a nice, pink color, whereas old fluid will be dark brown, perhaps even black. If the level is low or the fluid is too dark, then replace the fluid as soon as you can. To replace the fluid, you will have to drain it through the drain plug on the bottom of the transmission's pan, then fill it up through the transmission's dipstick.

If the transmission fluid is the proper level and color, proceed to Step 2.
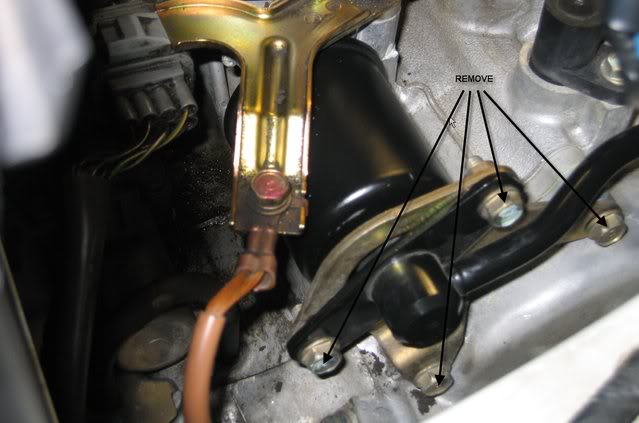
Step 2 – Check the transmission wiring
Wires could be cracked or worn.
Any cracks or wears in the transmission's wiring could make your transmission act up, anything from getting stuck in gears to shuddering. Take your flashlight and go under the car. Check all the wires going in and out of the transmission. The cleaner the wires are, the better the signal flows through it. If you find any bad wires, whether they are connected to sensors or to the transmission for power, replace them immediately to retain transmission performance. While you're down there, make sure you check the connections between the wires and the sensors to ensure they are installed properly.

If the transmission's wiring are in good condition, proceed to Step 3.
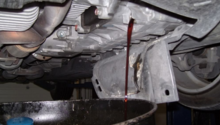
Step 3 – Check the transmission filter
It could be dirty or clogged.
There is a transmission filter outside of the transmission, which not a lot of people know about it. The filter is located near the transmission filler bolt, and it's held in place by a small bracket. When the fuel-filter-looking transmission filter gets too dirty and clogged, it could affect the smoothness of your transmission, and it could even prevent you from going into certain gears. The filter can be purchased for around $17, and the replacement of it is a breeze. If you've never replaced it, and it's rare to find people that have replaced theirs, replace it now and do your transmission a favor.
Related Discussions
- Hard Shifting - Acurazine.com
- Transmission Slipping - Acurazine.com
- Transmission Problems - Acurazine.com